
A vendor checklist helps me stop payment errors, tax issues, and missed renewals before they start. If I skip basic steps, one bad W-9 can trigger 24% IRS backup withholding, and one duplicate vendor record can lead to double payment. On top of that, 79% of organizations reported attempted or actual payments fraud in 2025, and third parties were tied to 30% of analyzed data breaches.
Here’s the short version: I need to qualify the vendor first, collect the right documents, get the right approvals, and track dates after setup with a contract renewal planner. I also shouldn’t treat every vendor the same. A low-risk office supplier needs a lighter review than a SaaS tool with access to customer data.
If I want a checklist that people will use, I keep it short and tiered:
- Confirm the need: business reason, owner, budget, spend, and start date
- Set the risk tier: based on data access and system access, not price
- Gather the file: W-9 or W-8, banking details, insurance, licenses, contracts, and security docs when needed
- Verify payment details: never accept bank changes by email alone
- Route approvals: finance, legal, ops, and IT/security when data access is involved
- Activate in systems: create the vendor record, assign terms, link contracts, and hold the first payment until setup is complete
- Track dates: contract end, auto-renewal notice, insurance expiration, and review dates
The core idea is simple: use one repeatable process, but scale the review to the risk. That helps me keep vendor files clean, cut payment problems, and avoid contract and compliance gaps.
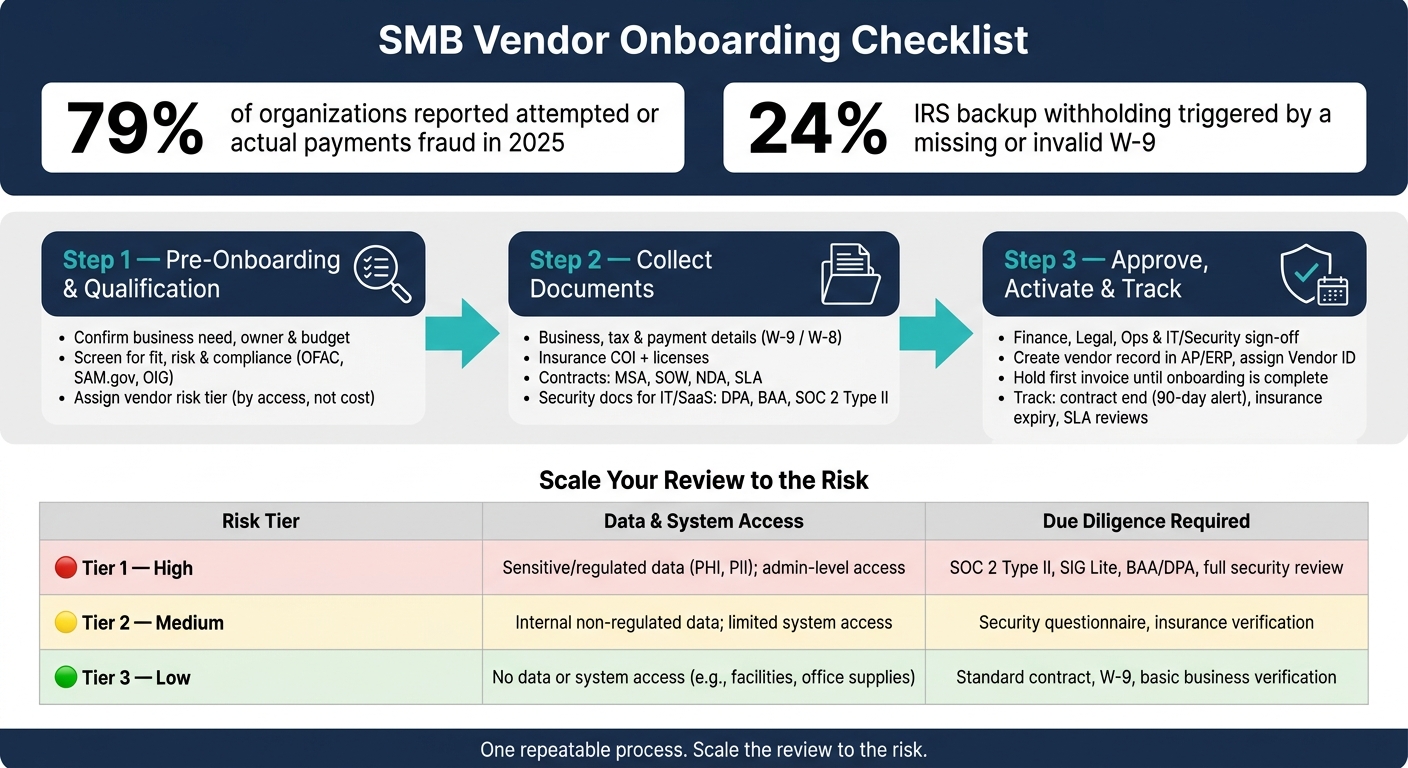
SMB Vendor Onboarding Checklist: 3-Step Process by Risk Tier
Step 1: Pre-Onboarding and Vendor Qualification Checklist
Before you start chasing documents, get the basics straight: why this vendor is needed, who owns the relationship, what it will cost, and what success should look like. Then use the vendor’s risk tier to decide how deep the rest of onboarding needs to go.
Confirm the Business Need, Owner, and Budget
Write down the problem the vendor will solve. If an approved vendor already does the job, use that option first.
Also confirm the requesting department, budget line, and expected annual spend. That number should include implementation costs, seat growth, and renewal increases. Give one internal person clear ownership of the vendor relationship. That person should handle renewals, issue escalation, and annual reviews. Set a target start date too.
Screen for Fit, Risk, and Basic Compliance
Before you ask for a full document package, do a pre-qualification check.
Verify the vendor’s legal name, confirm that no approved supplier already exists, and complete a basic financial stability review for higher-spend vendors.
If the vendor works in a regulated area like healthcare, financial services, or government contracting, check the OFAC SDN list, SAM.gov, and the OIG exclusion database. For high-value vendors, run an adverse media search before formal contracting begins.
Assign a Vendor Risk Tier
Use the risk tier to set the review depth. Tier by access, not by cost. A SaaS tool that processes customer PII is high risk. An office supplies vendor with no system access is not.
Here’s how the review depth should map to each tier:
| Risk Tier | Data & System Access | Due Diligence Required |
|---|---|---|
| Tier 1 (High) | Sensitive or regulated data such as PHI or PII; admin-level system access | SOC 2 Type II, SIG Lite, BAA or DPA, full security review |
| Tier 2 (Medium) | Internal non-regulated data; limited or scoped system access | Standard security questionnaire, insurance verification |
| Tier 3 (Low) | No data or system access, such as facilities or office supplies | Standard contract terms, W-9, basic business verification |
The risk tier should be assigned by IT, security, or a designated risk owner, not by the requesting team. That separation helps keep the classification independent from commercial pressure.
sbb-itb-49df6ae
Step 2: Collect Required Vendor Information and Documents
Once the vendor is qualified, gather the paperwork before payment goes out or system access is granted. The goal here is simple: build the full vendor file up front, not halfway through the relationship.
Business, Tax, and Payment Details
Every vendor should submit the same base identity and payment details, no matter the risk tier. Start with the legal entity name, any DBA name, business address, ownership structure, and both operations and billing contacts.
For tax compliance, U.S.-based vendors should provide a completed IRS Form W-9. Foreign vendors need the right W-8 series form – W-8BEN for individuals or W-8BEN-E for entities. If a valid TIN is missing, you may have to apply 24% backup withholding.
Banking details need extra care. Collect the bank name, routing number, and account number, then confirm them with a voided check or a signed bank letter. Don’t accept bank details or payment changes through email alone. Use a secure portal or call a known contact to verify the request. Also confirm the vendor’s payment method – ACH, wire, or credit card – along with standard terms such as Net 30.
Insurance, Licenses, and Policy Acknowledgments
If a vendor will be on-site, performing physical services, or delivering professional work, require a Certificate of Insurance (COI) before activation. Coverage should include General Liability, Errors & Omissions (E&O), Workers’ Compensation, and, for IT and data-handling vendors, Cyber Liability. Record both the coverage limits in U.S. dollars and the expiration dates.
A simple reminder system can save a lot of pain here. Set an alert 30 to 45 days before a policy expires so you don’t end up with a gap in coverage.
Beyond insurance, collect any needed business licenses and industry-specific certifications tied to the vendor’s work. If your company requires a supplier code of conduct, data security rules, or a conflict-of-interest policy, get a signed acknowledgment at this stage.
Contracts, Pricing, and Security Documentation
The exact document set depends on the vendor, but most will need the same core package: a Master Service Agreement (MSA), Statement of Work (SOW), Non-Disclosure Agreement (NDA), pricing schedule, SLA, and renewal and termination terms.
IT, SaaS, and cloud vendors usually need more scrutiny, especially if they can access customer data. In those cases, request a Data Processing Agreement (DPA) if the vendor handles personal data, and a Business Associate Agreement (BAA) if your company operates in a HIPAA-regulated setting. You should also ask for a current SOC 2 Type II report, a subprocessor list, and an incident response summary.
Use the table below as your intake template.
| Document Category | What to Collect | Who Needs It |
|---|---|---|
| Business & Tax | Legal name, DBA, EIN/TIN, W-9 or W-8, business address, ownership structure | Finance, Accounting |
| Banking & Payment | Routing/account number, voided check or bank letter, payment method, Net 30 terms | Finance, AP |
| Insurance | COI, coverage limits and expiration dates, General Liability, Workers’ Compensation, Errors & Omissions (E&O), and Cyber Liability where applicable | Legal, Operations |
| Licenses & Policies | Business licenses, certifications, signed code of conduct | Compliance, Legal |
| Contracts | MSA, SOW, NDA, pricing schedule, renewal/termination terms | Legal |
| Security (IT/SaaS) | DPA or BAA, SOC 2 Type II, subprocessor list, incident response summary | IT, Security |
Step 3: Complete Reviews, Approvals, and Vendor Activation
Once the vendor file is complete, the next job is simple on paper: get sign-off from the right people and activate the vendor in your systems.
This is also where many SMBs start to drift. The paperwork is there, but approvals happen in scattered email threads, and no one can say with confidence who gave the final green light. That’s a problem. You want a clear record of who approved what, and when.
Get Finance, Legal, and Operations Approvals
Each team has a different role here. Finance approves payment and tax setup. Legal approves the final terms. Operations approves scope and ownership. And Security/IT reviews vendors that handle sensitive data.
For low-risk vendors, like office supplies or one-time print services, finance-only approval is often enough. For higher-risk vendors, especially SaaS tools or vendors handling customer data, use cross-functional sign-off.
One point that trips teams up: set approval thresholds based on total contract value or annual commitment, not just the first invoice. A small starting bill can hide a much bigger commitment.
Set Up the Vendor in Systems and Share Go-Live Details
After approval, create the vendor record in AP or ERP. Assign a Vendor ID, set the payment terms, link the signed contract to the record, and verify banking details through a known contact.
Hold the first invoice until the onboarding packet has been checked and the vendor is marked "active" in your system. That extra pause can save a lot of cleanup later.
If the vendor needs system access, give only the permissions they need. Use named accounts instead of shared logins so you keep a clear audit trail.
Then share go-live details with both sides. Inside your company, make sure the right teams know:
- how to submit purchase orders
- who owns the vendor relationship
- who to contact when something goes wrong
On the vendor side, send invoice submission instructions, your preferred PO process, support contacts, and escalation paths. A short kickoff email that covers these basics can cut down a lot of back-and-forth after launch.
Track Key Dates and Post-Onboarding Obligations
Activation isn’t the end of the process. As soon as the vendor goes live, record every renewal, expiration, and review date.
That includes contract start and end dates, auto-renewal notice periods, insurance certificate expiration dates, and SLA review cadence. If a vendor holds professional licenses or security certifications, track those expiration dates too.
If you work with a large vendor base, keep these dates in one central log. Otherwise, missed renewals and expired documents can sneak up on you.
| Date to Track | Recommended Alert Window | Why It Matters |
|---|---|---|
| Contract end / auto-renewal | 90 days and 60 days out | Gives time to renegotiate or terminate |
| Insurance certificate expiration | Before expiration | Prevents coverage gaps |
| Professional license or certification expiration | Before renewal deadline | Prevents lapses in required credentials |
| SLA review cadence | Per contract terms | Keeps performance accountable |
Conclusion: A Vendor Onboarding Checklist SMBs Can Reuse
A reusable SMB vendor onboarding checklist keeps things simple. First, confirm the need. Then assign an owner and a risk tier, collect documents before work starts, route approvals, and track key dates. When this process is in place, it helps prevent missed payments, access errors, and renewal gaps.
Consistency beats perfection.
That matters more than most teams expect. If a checklist gets too long or too fussy, people stop using it. Keep it short enough that it fits into day-to-day work. A tiered approach makes that easier. Low-risk vendors can move through a lighter path, while higher-risk vendors need more sign-offs. That’s not red tape for the sake of it. The level of review should match the actual risk.
The checklist also needs upkeep after activation. If nobody updates the records, even a good process starts to drift. A central contract repository with renewal reminders can help keep W-9s, insurance, and key dates current.
Start by running the checklist on your first few vendors. Then tighten what feels clunky, keep what works, and make it part of your standard process. Use it, update it, and keep it lean.
FAQs
Who should own vendor onboarding?
Vendor onboarding needs clear internal ownership. Each vendor should have a designated internal owner who handles the relationship, renewals, and issue escalations.
The requester defines the business need. Approval authority, meanwhile, is split across finance, legal, security, and operations based on spend, risk, and contract type.
For SMBs, Trackado helps keep that accountability in one place by centralizing contracts, tracking key dates, and managing approval workflows.
How often should vendor records be reviewed?
Review vendor records on a set schedule that fits how your team works. A common setup is a 90-day check-in for critical tier-one vendors and a six-month review for tier-two partners.
For consistency, tie those reviews to your month-end close and weekly cash flow process. Trackado can help by keeping contracts in one place and sending automated reminders for renewals and performance milestones.
What’s the easiest way to track renewals and expirations?
Use a central contract management platform like Trackado. It keeps key contract details – like start dates, end dates, and auto-renewal terms – in one organized place, so you don’t have to chase them down in spreadsheets or email.
Automated reminders and milestone tracking help you stay ahead of renewal, cancellation, and compliance deadlines.